What Is ISP Pinout
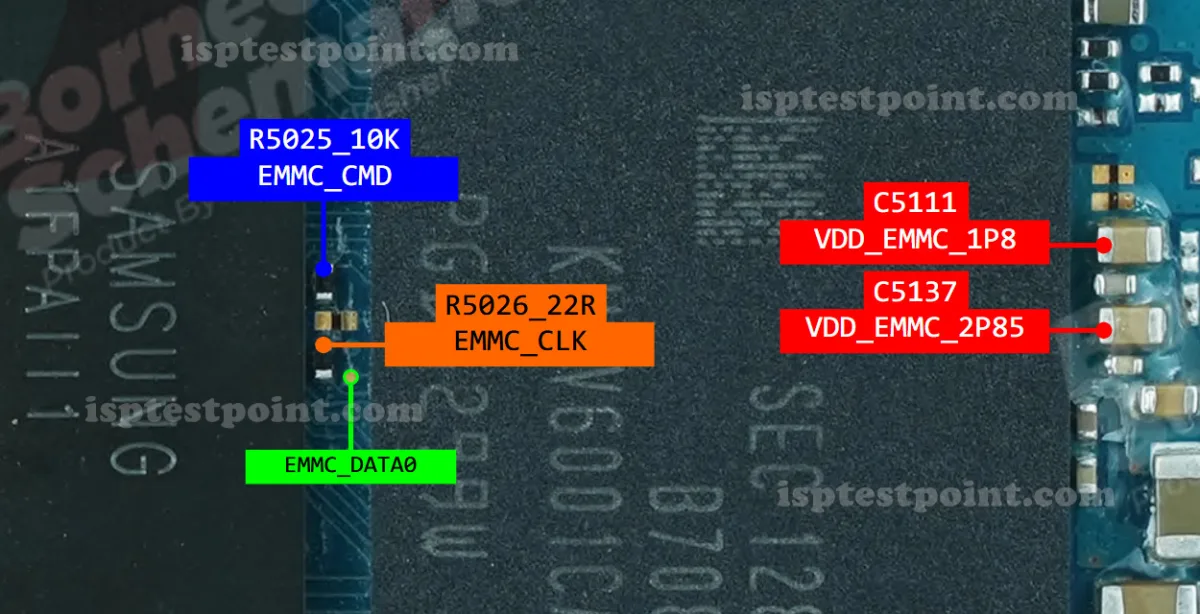
ISP (In-System Programming) is a hardware-level repair technique that allows technicians to communicate directly with the eMMC flash storage chip on a device PCB, bypassing the main CPU and operating system entirely. On the Samsung SM-A12S (model A127), the eMMC is soldered to the motherboard and cannot be removed without risk of chip damage. ISP pinout access uses exposed test pads on the PCB to establish a direct data bus connection between the eMMC and an external programmer. This method enables reading, writing, and erasing the eMMC at the raw data level, making it one of the most powerful tools in mobile repair for situations where software-based methods are no longer viable.

When to Use ISP
ISP access on the SM-A12S is appropriate when conventional repair methods have failed. Common scenarios include:
- Device is hard-bricked or stuck in a dead-boot loop that cannot be resolved by Odin or Download Mode
- FRP (Factory Reset Protection) lock persists after failed software unlock attempts
- eMMC is corrupted due to a failed OTA update or interrupted flash procedure
- Bootloader is damaged and the device does not enter any recovery or download mode
- Pattern or PIN lock that cannot be bypassed through ADB or recovery
ISP should be considered a last resort after standard software and EDL/ADB methods have been exhausted, as it carries risk if performed incorrectly.
SM-A12S ISP Test Points
The SM-A12S (A127) uses a MediaTek Helio P35 platform with an eMMC 5.1 storage chip. The ISP test pads are located on the back side of the motherboard, typically grouped near the eMMC package. The standard eMMC ISP interface uses the following signals:
- CLK — eMMC clock signal
- CMD — Command line for eMMC communication
- DAT0 — Primary data line (minimum required for ISP)
- VCC — eMMC core power supply (typically 3.3V)
- VCCQ — eMMC I/O power supply (typically 1.8V)
- GND — Ground reference
Exact pad coordinates on the A127 PCB are not universally confirmed across all hardware revisions. Technicians should cross-reference a verified ISP pinout diagram from a trusted tool manufacturer before probing.
ISP Access Procedure
Follow these steps to perform ISP access on the SM-A12S:
- Fully disassemble the device and remove the motherboard safely
- Clean and inspect the ISP test pad area under magnification Connect ISP adapter or solder fine wire leads to CLK, CMD, DAT0, VCC, VCCQ, and GND pads
- Connect the adapter to your programmer (e.g., EasyJTAG Plus or UMT ISP adapter)
- Launch the programmer software, select eMMC ISP mode, and choose the correct chipset/platform
- Power the board via the programmer's regulated supply — do not use the battery
- Initiate read, write, or erase operation as required and wait for completion without interruption
Safety Tips and Warnings
ISP operations on the SM-A12S carry significant risk if proper precautions are not observed:
- Always verify voltage levels before powering — VCC must be 3.3V and VCCQ 1.8V; incorrect voltages will destroy the eMMC
- Use only fine-tipped soldering tools and quality flux to avoid bridging nearby components
- Never connect or disconnect ISP wires while the board is powered
- Ensure a stable ground connection before initiating any read or write operation
- Do not interrupt a write or erase process — this can cause permanent eMMC corruption
- Back up the full eMMC dump before writing or erasing any partition
Pin / Test Point Reference
| Pin | Description |
|---|---|
| CLK | eMMC clock signal test pad — Required for ISP communication |
| CMD | eMMC command line test pad — Required for ISP communication |
| DAT0 | Primary eMMC data line — Minimum data line needed for ISP |
| VCC | eMMC core power supply — 3.3V — verify before connecting |
| VCCQ | eMMC I/O power supply — 1.8V — verify before connecting |
| GND | Ground reference pad — Stable ground essential for reliable communication |
Tools required: EasyJTAG Plus with ISP adapter, UMT ISP Adapter, Medusa Pro II, Fine-tip soldering iron, Quality flux, Multimeter, Magnification lamp or microscope
Supported operations: Read Firmware, Write Firmware, FRP Erase, Dead Boot Repair, eMMC Full Backup, Pattern/PIN Lock Remove, Partition Restore
⚠ Safety note: Use regulated 3.3V VCC and 1.8V VCCQ only. Wrong voltage permanently damages eMMC. Never interrupt write/erase. Always backup before modifying.

Comments (0)
Be the first to comment.