Description
The Qualcomm SM4250, better known commercially as the Snapdragon 460, is a mid-entry mobile platform found across a wide range of budget Android phones. When a device built on this chipset gets stuck on the logo, enters a bootloop, or refuses to pass the FRP (Factory Reset Protection) screen, software-based recovery often fails because the bootloader is locked or the USB port is unresponsive. In these cases, ISP (In-System Programming) becomes the reliable hardware-level solution. ISP lets a technician communicate directly with the phone's flash storage by connecting to a small set of test pads on the motherboard, completely bypassing the CPU boot sequence and any locked software layers.

Qualcomm SM4250 ISP Pinout Review
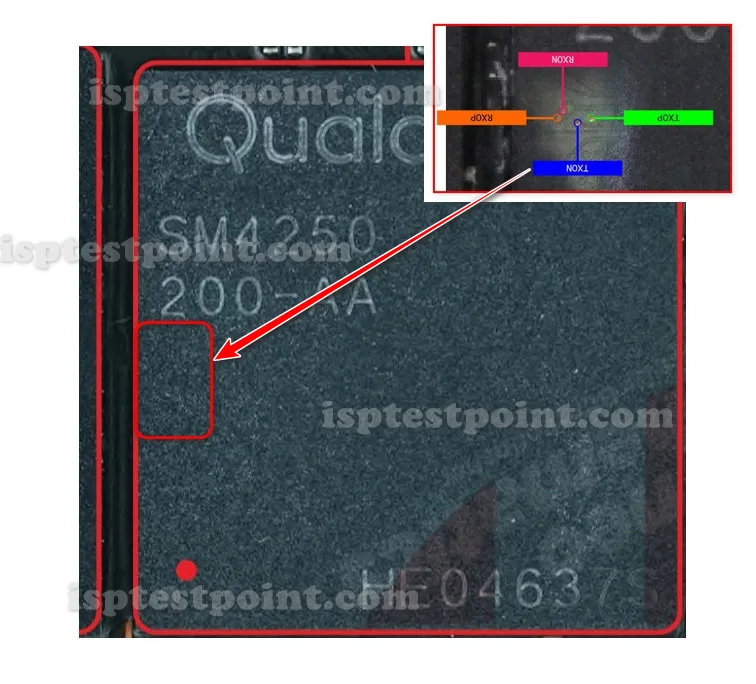
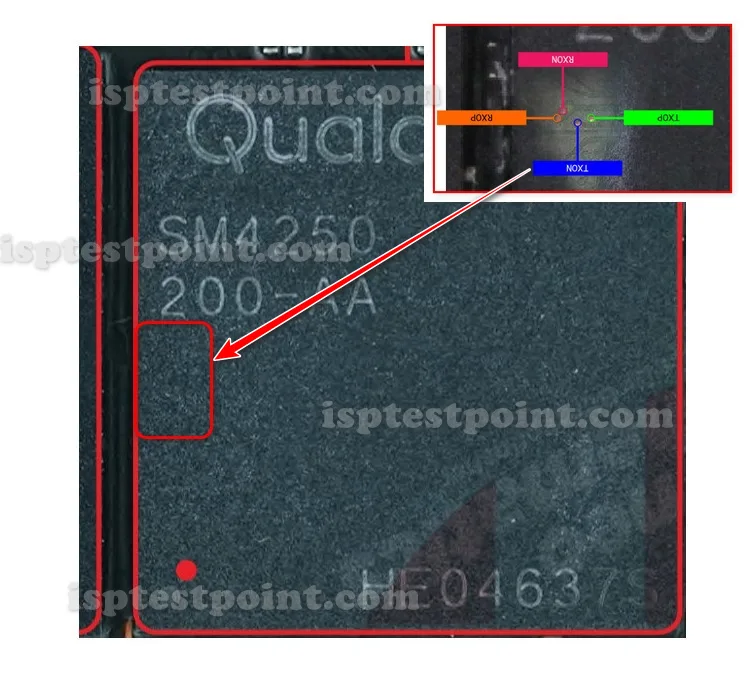
For the SM4250 platform, the four essential ISP communication points used in dead-boot and FRP work are TX ON, TX OP, RX ON, RX OP. These points carry the serial transmit and receive signals needed to establish a link between your ISP programmer box and the storage controller. TX ON and TX OP handle the transmit side of the connection, while RX ON and RX OP manage the receive side. On the SM4250 board, these pads sit close to the flash storage chip and are typically unmarked on the silkscreen, so a verified pinout diagram is essential before soldering. Because these pads are small and grouped tightly together, use fine-tip probes or a pogo-pin jig to avoid bridging two points together, which can short the interface and cause a failed session. Always confirm each point with a multimeter in continuity mode before applying any power to the board.
How To Find ISP Pinout SM4250
Finding the ISP pads on an SM4250-based device requires full disassembly. Start by removing the back cover with a heat gun or suction tool, then immediately disconnect the battery flex cable — this is a mandatory safety step. Remove the screws holding the midframe and lift the motherboard out of the chassis. Flip the board to expose the side where the flash storage chip sits, usually near the center of the board and often under a small shielding can that needs to be removed for access. Using a magnifying loupe or digital microscope, locate the four pads corresponding to TX ON, TX OP, RX ON, and RX OP. Compare what you see against the downloaded pinout diagram, aligning nearby landmark components like capacitors and via holes to orient the image correctly. Once identified, test each pad for continuity, then solder thin 30AWG wires or seat a pogo-pin adapter.
How To Reset FRP Unlock With Dril CPU
Once your four ISP points (TX ON, TX OP, RX ON, RX OP) are connected to your programmer, power the board through the tool only — never reconnect the battery during the session. Open your Dril CPU tool (or equivalent ISP flashing software) and select the Qualcomm SM4250 profile from the chipset list. The tool should detect the storage controller within a few seconds if all four connections are solid. To reset FRP, navigate to the FRP erase or partition management section of the tool and select the FRP partition for deletion. This clears the Google account lock without wiping the entire firmware. Confirm the operation and let the tool complete the erase. Once finished, disconnect all ISP wires, reconnect the battery, and power on the device. The phone should boot past the FRP screen. If the tool cannot detect the chip, recheck your RX and TX pad connections, since a swapped TX/RX pair is the most common cause of a no-detect error.
Final Words
The Qualcomm SM4250 ISP pinout provides a dependable path for FRP reset and dead-boot recovery on budget Snapdragon 460 devices. The key to success is accurate identification of the four points — TX ON, TX OP, RX ON, RX OP — and a stable connection to your Dril CPU or ISP tool. Always work under ESD protection, keep the battery disconnected during the session, and confirm each pad with a multimeter before powering on.

Comments (0)
Be the first to comment.