What Is a Test Point
A test point is a designated exposed copper pad or via on a device's printed circuit board (PCB) that provides direct electrical access to the processor or memory bus. On the OPPO F5 Pro CPH1727, test points are used by repair technicians to force the device into a special low-level communication mode — most commonly MediaTek's Emergency Download Mode (BROM/META mode) — when normal software-based entry methods are unavailable. This makes them essential for recovering devices that are completely unresponsive to standard recovery procedures.

When Technicians Need This
Accessing the test point on the OPPO F5 Pro CPH1727 becomes necessary in several repair scenarios:
- FRP (Factory Reset Protection) bypass: When the device is locked to a Google account after a factory reset and standard unlock methods fail.
- Dead boot repair: When the phone fails to power on due to corrupted bootloader or firmware, and cannot enter fastboot or recovery mode normally.
- IMEI repair: When the baseband or IMEI has been wiped and must be restored via direct flash.
- Full firmware flashing: When the device is soft-bricked and cannot be reached through USB in normal ADB/fastboot modes.
- Pattern or PIN lock removal: When the user lock cannot be bypassed through software tools alone.
Locating the Test Point
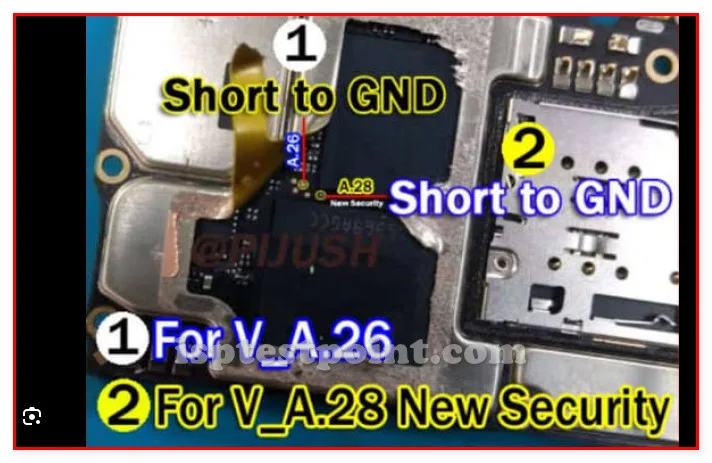
To access the test point on the OPPO F5 Pro CPH1727, the rear cover and battery must be removed first. After removing all securing screws and lifting the main PCB shield, look for a small exposed solder pad located near the MediaTek MT6763T SoC on the main board. The specific test point used to trigger BROM mode is typically found close to the USB controller or CPU area on the underside or edge of the main PCB. It is a small, round, unmasked copper pad. Use a magnifying glass or stereo microscope to locate it precisely, as it may be unlabeled.
Step-by-Step Access Procedure
Follow these steps carefully to trigger EDL/BROM mode using the test point:
- Power off the OPPO F5 Pro CPH1727 completely and disconnect the battery.
- Disassemble the device and expose the main PCB, removing any metal shielding over the relevant area.
- Using a fine-tip conductive tweezer or a thin wire, bridge (short) the test point pad to the adjacent ground pad.
- While maintaining the short, reconnect the battery or apply bench power, then connect the USB cable to your PC.
- Launch your flash tool (e.g., SP Flash Tool or UFi Box) — the device should enumerate in BROM or META mode.
- Once detected, release the short and proceed with your intended operation (FRP erase, firmware flash, etc.).
Safety Tips and Precautions
Working with test points carries risk of permanent board damage if not done carefully. Observe the following precautions:
- Never apply more than 3.3V to any test pad — overvoltage will destroy the CPU or eMMC.
- Use ESD-safe tools and wear an anti-static wrist strap at all times.
- Do not leave the short in place after the device enumerates on the PC — remove it promptly.
- Avoid using metal tools that could slip and bridge unintended components, causing short circuits.
- Always use a bench power supply with current limiting when testing on a damaged board to prevent thermal damage.
Pin / Test Point Reference
| Pin | Description |
|---|---|
| BROM Test Point | Small exposed copper pad near the MT6763T CPU; short to GND while connecting USB to trigger MediaTek BROM/META mode. — Exact pad coordinates unconfirmed; verify with board-level schematic or microscope inspection. |
| GND | Ground reference pad adjacent to the BROM test point; used as the shorting target. |
Tools required: SP Flash Tool (MediaTek), UFi Box, EasyJTAG Plus, UMT Dongle, Miracle Box, Fine-tip conductive tweezers, Anti-static wrist strap, Stereo microscope or magnifying glass, Bench power supply
Supported operations: FRP Erase, Dead Boot Repair, Full Firmware Flash, IMEI Repair, Pattern/PIN Lock Removal, Read Firmware/Backup
⚠ Safety note: Do not exceed 3.3V on any test pad. Use ESD protection. Remove the short immediately after BROM enumeration to avoid CPU damage.

Comments (0)
Be the first to comment.