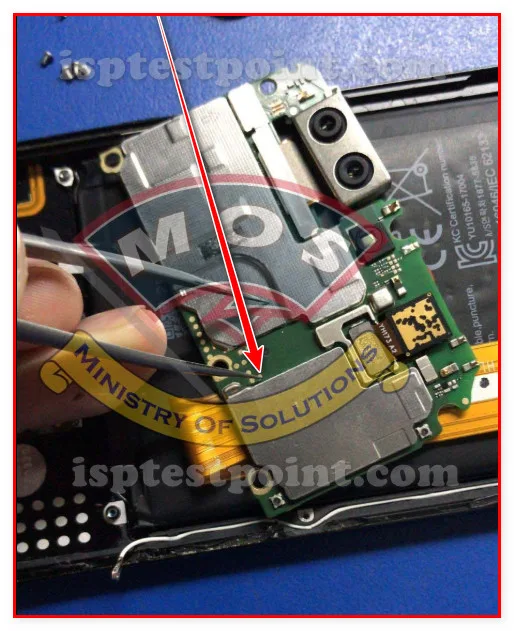
Huawei Nova 2 Test Points — Overview of Critical Diagnostic Locations and Functions
The Huawei Nova 2 is a mid-range Android device released in 2017, featuring the HiSilicon Kirin 659 processor. Test points on this device provide direct hardware access to the eMMC storage and system buses, enabling technicians to perform firmware operations, FRP (Factory Reset Protection) removal, and recovery of dead-boot conditions. The primary test points are located on the mainboard near the eMMC chip and CPU area. Proper identification and safe probing of these points is essential for successful ISP (In-System Programming) operations without risking permanent damage to the device.

When to Use Test Points — Troubleshooting Scenarios Requiring Hardware-Level Verification
Test points are necessary when the device exhibits the following conditions: (1) FRP lock after factory reset, preventing normal startup; (2) corrupted firmware causing bootloop or complete dead-boot state; (3) failed OTA updates that render the device unresponsive; (4) locked bootloader preventing standard flashing methods; (5) IMEI or baseband corruption requiring eMMC-level intervention. Using test points bypasses software restrictions and allows direct eMMC read/write access through a dedicated ISP programmer such as UMT, EasyJTAG Plus, or similar hardware tools.
Accessing Test Points Safely — Step-by-Step Procedure to Locate and Probe Without Damage
Begin by powering off the device completely and removing the battery (if accessible). Locate the mainboard and identify the eMMC chip—typically a BGA or NAND flash package near the processor. Use a magnifying glass or microscope to identify test pad clusters. These are small exposed copper points or vias, often unlabeled. Connect your ISP programmer's probe set with extreme care, applying minimal pressure to avoid lifting pads. Ensure all probes are seated firmly and in the correct orientation before initiating communication. Always verify connections with a multimeter before starting any eMMC read operation.
Common Test Failures — Interpreting Results and Identifying Component Faults
If the programmer cannot detect the eMMC, check: (1) continuity between test pads and the eMMC chip using a multimeter; (2) for lifted or corroded pads; (3) that all probe connections are fully seated; (4) power rail stability (typically 3.3V or 1.8V). If reads succeed but writes fail, the eMMC may be read-only or have bad blocks. If authentication errors occur during FRP erase, the device's security fuses may be permanently locked, requiring alternative methods or vendor-specific tools.
Safety Precautions — Essential Warnings for Avoiding Short Circuits and ESD Damage
Always ground yourself before touching the mainboard to prevent electrostatic discharge (ESD). Use an anti-static wrist strap connected to a grounded work surface. Do not probe while the device is powered or while the USB cable is connected unless explicitly required. Avoid excessive pressure on test pads, which can cause permanent fractures in PCB traces. Ensure probes are the correct gauge and sharp enough to contact pads without slipping. Never apply voltage higher than the device's rated supply (3.3V or 1.8V). If the device becomes hot during operations, disconnect immediately.
Pin / Test Point Reference
| Pin | Description |
|---|---|
| eMMC_CLK | Clock signal for eMMC communication |
| eMMC_CMD | Command/control line for eMMC operations |
| eMMC_DAT0-DAT7 | Data bus lines (8-bit data transfer) — Multiple pins for parallel data transmission |
| eMMC_VCC | Power supply for eMMC (typically 3.3V) |
| eMMC_VCCQ | IO power supply for eMMC (typically 1.8V or 3.3V) |
| eMMC_GND | Ground reference points — Multiple GND points required for proper probing |
| eMMC_RST | Reset signal for eMMC chip |
Tools required: UMT (Universal Memory Toolkit), EasyJTAG Plus, eMMC ISP Programmer, Multimeter, Magnifying glass or PCB microscope, Fine probe set (0.5mm gauge), Anti-static wrist strap, Power supply (3.3V, 1.8V regulated)
Supported operations: Read Firmware (Full ROM dump), Write Firmware, FRP Erase / Google Account Unlock, Dead Boot Repair, IMEI Restoration, Baseband Recovery, eMMC Chip Detection
⚠ Safety note: Do not probe while device is powered or USB-connected. Avoid ESD by grounding yourself. Use 3.3V/1.8V supply only. Excessive probe pressure may fracture PCB traces. Discontinue operation if device overheats.

Comments (0)
Be the first to comment.